Driving Manoeuvres
This section covers Driving Manoeuvres | Tips & Tricks for all four manoeuvres - any one of which you may be asked to do during your test. It is designed and written by experienced and qualified driving instructors.
The practical driving test will involve you taking a minimum of one out of the possible four driving manoeuvres available. But you will not know which manoeuvre the Driving Examiner will request so you need to learn them all.
The tutorials below show every aspect of the manoeuvre covered, including appropriate observations and reference points. It will take time to learn them until you feel confident, but if you are well prepared you will pass this section of the driving test.
Driving Manoeuvres 101
1.Pulling up on the right and reversing
This manoeuvre involves driving and parking against the flow of traffic. Although the Highway Code does not recommend this, you may need to pull up on the right-hand side of the road at some point. Whether it’s popping into the shop, or if you live on the right side of the road, you will need to know how to do it.
The examiner is looking for 3 different skills when you perform this manoeuvre:
- Control – slow and steady does it!
- Accuracy – make sure you have good road position
- Observations – Don’t forget your MSM routine - Mirror Signal Manoeuvre!
When your examiner asks you to perform the manoeuvre, you will be asked to pull up on the right when it is safe to do so. The examiner will have chosen a specific location for you to do this manoeuvre and will make sure that you have no restrictions in your way, such as not enough space, or double yellow lines.
If you can, you should try to avoid
- Parking directly behind another vehicle
- Pulling up too close to a junction or opposite a junction
- Stopping directly across a driveway
- Stopping directly opposite a vehicle that is parked on the left
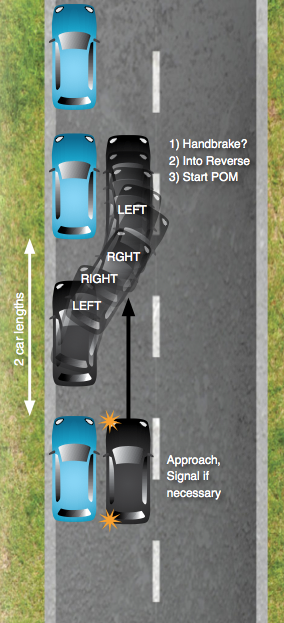
Step by step – pulling over on the right
- Locate the ideal place to full over
- Mirror check, blind spot, signal
- Leave a good distance from when you start the manoeuvre to where you want to pull up, around 8 car lengths should do it!
- Make your way over to the right, using a shallow angle. If you turn into the road too much, you have a higher risk of hitting the kerb!
- Stop around 20cm-30cm away from the kerb.
- Your next step in the manoeuvre is reversing, so make this easier for yourself by stopping in line with the kerb and stopping with your wheels straight.
- Cancel your signal and if you’re on a slope, put your handbrake on.
Now your examiner will ask you to reverse 2 car lengths. If you have managed to stop in a straight line, parallel to the kerb then this will be a breeze!
Step by step – reversing and pulling off
- Select the reverse gear.
- Keep your eyes peeled. The same routine applies when you’re reversing. If there are vehicles or pedestrians around, wait for them to pass before starting.
- Check all your mirrors and start reversing when you are looking out of the back window.
- Keep your speed at walking pace – there is probably no need for any gas when reversing.
- Once you have reversed enough or the examiner asks you to stop, then secure the car.
And you’re done!
Now all you need to do is pull away, using the usual MSM routine. Check your blind spots, select first gear and if it’s clear, move off.
2. Parallel Parking
Objectives: You should be able to identify a safe and legal place to carry out the parallel park. And be be able to park reasonably close to and parallel to the kerb by reversing into a space of not more than two car lengths. The manoeuvre should be completed under control, with due regard for the safety of other road users.
Make sure its safe and legal
Avoid blocking driveways, parking too close to a junction or on double yellow lines. There’s more, so check the highway code.
Initial approach
Apply the MSPSL (Miiror-Signal-Position-Speed-Look) routine. Remember if there is a car behind you, slow down gradually so you don’t surprise them and signal your intention to pull in.
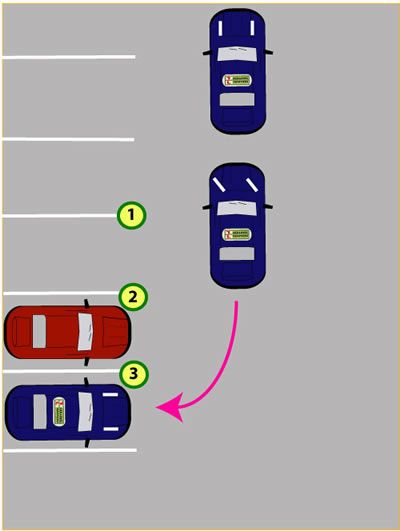
Start Position
You should be roughly an open car door away from the parked car and your boot should look level with their boot. Look at diagram for more info.
The routine, using focal points
There are many techniques used by Driving Instructors to help you carry out this manoeuvre. Your instructor will be able to give you some good tips and reference points on the car so you will easily be able to do the parallel park.
Turn Left when the back of your car is in line with the back of the car you are reversing behind.
Turn Right when you are roughly at a 45 degree angle
Reverse back for a short time until the kerb disappears in your left door mirror. Now turn Right again.
The front end of the car will begin to swing in, once it looks parallel or directly behind the car in front of you. Then straighten the wheels by turning Left to finish. Your instructor may adjust the focal points slightly depending on the car you are learning in.
Check out Our Step by Step guide to Parallel Parking
1. Prepare the car and then check all around, 360 degrees. You should only pull out if it is safe to do so.
2. Once you have pulled out, check your mirrors before pulling up next to the parked car. If there is someone behind you, then signal and stop next to the parked car.
3. Use the handbrake if on a hill, select reverse and then cancel the signal. Your reverse light is on now, so vehicles behind should understand you are about to reverse.
4. Prepare the car again to move off under control.
5. Assuming you have prepared the car, look all around you starting from right to left. If safe release the handbrake.
6. The moment the car moves back, turn the steering wheel one full turn left (when the boot of your car is in line or just after you have passed the back end of their car). Avoid dry steering too.
7. If you need to slow down slightly, just dip the clutch. Keep looking over your left shoulder because you are parking on the left.
8. Check your left door mirror. When you feel the car is at the correct angle then you need to check over your right shoulder and turn the steering wheel one full turn to the right. If you need to stop to check it's safe to continue, this is absolutely fine. Observations are important and necessary.
9. Keep reversing back slowly, checking all around. Imagine you are parking on a busy road with lots of pedestrians, cyclists etc.
10. Soon you will need to turn one full turn to the right again. The best time to turn right is when you see the kerb close to the front part of the passenger door handle. It will vary slightly depending on the type of car you are driving, but this will work for the majority of vehicles. You must turn the wheel quickly in order for this technique to work and be careful not to oversteer and try to avoid dry steering
11. The car should begin to swing into the space, keep the vehicle speed very slow and stop if there are any vehicles approaching still, as it isn’t your priority. So you will need to keep looking in all directions, so don’t miss anything.
3.What is the examiner looking for?
Control – keep the vehicle slow, and control the speed
- Accuracy – keep within the lines of the bay
- Observation – be aware of everything that is happening around you and act accordingly
Rules
- You cannot drive through the first parking pay, to one in front of that.
- When reversing, you must not reverse into any bays behind you.
- You can make corrections if you need to. If you enter the bay but feel like you’re too close to the lines/other vehicles, you may reverse out and start again.
Step by step – forward bay parking
Make sure you are following the MSM routine throughout this manoeuvre. Keep checking those mirrors!
- Give yourself a wide turning circle by safely pulling as far across the side away from your target bay, as possible.
- Show your intentions; check your rear view and door mirrors, then signal
- When your reference point appears just under your door mirror, stop the car. Take a final look in your mirror and blind spot and if all is clear, very slowly move off whilst quickly putting on full lock in the direction you're aiming for
- As you enter the bay, straighten up your steering wheel when your dashboard is in line with the horizon
- Your reference point to stop is when the end kerb or line comes just under your door mirror. When the kerb reaches this point, select neutral and put the handbrake on.
As long as you've got room to get the car in and out (and don't approach it like this) then you should be fine 😉
Step by step – reversing out of the bay
- Select the reverse gear
- Check the road you’re reversing into as much as you can. If all is clear, begin reversing slowly
- Continue to reverse straight until you reach the reference point; when your door mirrors are in line with the top of the bay park lines
- Turn the steering wheel either half left or half right (depending on which way you are going). As you begin to turn the wheel, the front end of the car will swing out, so you need to make sure you’re also checking you don’t hit any parked vehicles around you
- Put your full lock on, and continue reversing until you know you have enough space to move off. Once you know you have enough space, stop the car
- Before pulling off, remember to check your blind stops and when you’re happy that it's clear - select first gear and pull away.
And you're done!
Check out Our Step by Step guide to Bay Parking
When positioning the car for the manoeuvre, give yourself plenty of room from the bays you are reversing into. This will make the 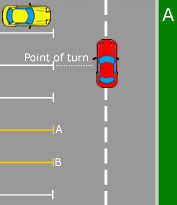 parking easier. Also making sure you leave enough room to your right as your car front will swing out. Position the car so that the passenger door has a bay line half way through it as in diagram A. This technique will guide the car 3 bays (the yellow lines) away from the line you positioned with the car door.
Once stopped, apply the handbrake and select reverse gear.
Before you move the car, take a good look around to make sure there are no oncoming vehicles, cyclist or pedestrians. Look out the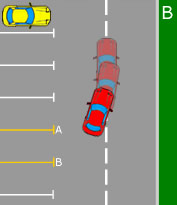 rear windscreen and if all clear very slowly move the car backwards, turning the wheel briskly to full left lock. Ensure you keep the car at a very slow walking pace throughout using clutch control as you need to consistently look around. Also take frequent glances in your left wing mirror as you will see line A appear. You will be able to use line A as a reference point to how you are entering the bay. If too close take off half a turn of the steer to the right. This will widen your turning circle putting you closer to line B.
If for what ever reason things aren’t looking too good at this point, the examiner will be perfectly happy for you to pull forward slightly to readjust. Providing you do this safely.
As you start to enter the bay, line B will come into view in your right hand wing mirror. You will then be able to assess both line A and B 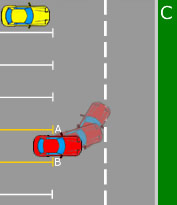 in your mirrors to establish an equal distance from both. Providing you keep the car very slow, you will be able to constantly look around and make frequent adjustments.
Don’t forget to keep looking out the rear windscreen too!
If at any point during this manoeuvre a car, pedestrian, cyclist etc approaches, stop the car. Either let them go past or if they stop to let you carry on then continue with the exercise.
Once you have finished reversing into the bay, apply the handbrake and select neutral.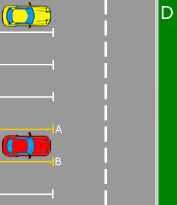
Even when you have completed the manoeuvre and all has gone terribly wrong, ask the examiner if you can do it again. Time permitting, the examiner may well let you. If the manoeuvre is successful on your second attempt, you may well still pass your test.